Written by Jared Wolff, Hardware and firmware enthusiast. Proud father of the nRF9160 Feather.
This blog originally ran on the Interrupt blog. For more content like this, click here.
If you’ve heard the news about the nRF9160 then you know it’s a game-changer. ARM Cortex M33 + LTE Cat-M + NB-IoT and GPS all included under one System in Package. Drool-worthy, right?
Well, if you’ve been using the nRF SDK to build nRF5x projects, you likely feel like you’re hanging from your toes. That’s because Nordic has chosen to adopt Zephyr as their RTOS of choice for the nRF9160.
Although there is plenty of documentation about Zephyr, making the transition can still be tough. Many nRF SDK enthusiasts will find themselves lost in a sea of CMake files and Kconfigs. I’m here to help with that!
This is the guide I wish existed while I was developing some drivers for the nRF9160 Feather. I spent weeks getting accustomed to how Zephyr worked, figuring out what files needed to be where, and how the heck to include a header file. (Fun times.)
In this post, I’ll go over some of the nuances related to creating drivers for your peripherals on Zephyr. We’ll talk about Device Tree organization, Kconfig, and CMakeLists.txt files. By the end, you should have an idea on how to tackle your own Zephyr driver aspirations!
{:.no_toc} ## Table of Contents
- auto-gen TOC: {:toc}
Example Walkthrough
In this example, you’ll learn about what it takes to create a driver for the PCF85063A real-time clock and counter. I’ve chosen to use the counter API for reasons we’ll discuss in a bit. There are some prerequisites to getting started though. Let’s begin with SDK Setup.
SDK Setup
I’ll be referencing Nordic’s nRF Connect SDK a bunch throughout this post. I’ve been building and testing nRF9160 Feather on v1.3.0. I won’t be going into detail on how to set up the SDK though. Nordic has great documentation you can check out to get started. I’ve also discussed my experience here.
What west can do for you
The Zephyr project uses a CLI tool, west, for project management, compilation, and flashing. west replaces the idea of a top-level Makefile and project dependency management like Git submodules. For the most part, it accomplishes that goal well.
You’ll need to install west if you haven’t already. Follow the SDK setup links above for more information.
Building
To build a project, navigate to the directory for the application in question and run west build. For example:
$ cd ncs/nrf/samples/nrf9160/nrf_cloud_agps
$ west build -b circuitdojo_feather_nrf9160ns -p
This builds in the current folder for the circuitdojo_feather_nrf9160ns board. You can find all the possible arm based boards in ncs/zephyr/boards/arm/ The -p flag tells west to clean before building.
A ton of things happen in the background to build a project. We’ll discuss more how things compile in the next section.
Flashing
Flashing code is as simple as running west flash from your project directory. You can use the -r parameter to choose which programming method you’d like to use. Common options are jlink, nrfjprog (for Nordic projects), pyocd, openocd, dfu-util, etc.
These “runners” are set in the board configuration. Here’s the board.cmake for the nRF9160 Feather located in zephyr/boards/arm/circuitdojo_feather_nrf9160/board.cmake:
board_runner_args(nrfjprog “–nrf-family=NRF91”)
board_runner_args(jlink “–device=cortex-m33” “–speed=4000”)
include(${ZEPHYR_BASE}/boards/common/nrfjprog.board.cmake)
include(${ZEPHYR_BASE}/boards/common/jlink.board.cmake)
As you can see, the nRF9160 Feather supports the nrfjprog and jlink options.
Dependency Management
There are a few different ways of handling dependencies in firmware land. I’ve used Git submodules as my dependency “manager” of choice. Zephyr though, is very opinionated on how you should work with your dependencies. Let’s look into how we do that with west and a west.yml file.
west.yml is a manifest file much like a Cargo.toml in rust or package.json for Node. You initialize a Zephyr repository using west init command. This does a shallow git clone for each dependency and puts them into place.
Here’s what a west.yml file may look like. This was for a personal project that uses NanoPB and also the nRF Connect SDK.
manifest:
remotes:
– name: nrfconnect
url-base: https://github.com/nrfconnect
– name: nanopb
url-base: https://github.com/nanopb
projects:
– name: nrf
remote: nrfconnect
revision: v1.3.0
import: true
– name: nanopb
repo-path: nanopb
revision: 0.3.9
path: pyrinas/ext/nanopb
remote: nanopb
self:
# This repository should be cloned to ncs/nrf.
path: pyrinas
The west.yml file doesn’t affect driver operation. If you’re going to include your drivers as a separate repo though, this is where you would add it! You can learn more though by going to the Zephyr documentation on West Manifests. (complete with crazy dependency diagrams and more!)
How Things Compile
One of the important things to know about driver development is how things compile. It may bend your mind a bit but we’ll get through this together.
CMakeLists.txt
If you spend enough time in Zephyr, you may see some patterns emerge. Many folders and sub-folders have this dynamic duo: CMakeLists.txt and Kconfig. These files are where all the magic happens.
You may already have an idea of what CMakeLists.txt does by its name. It’s a Makefile of sorts that you use to add source files and include folders to a project. The neat thing about cmake is that it’s recursive (for better or for worse). This means a higher-level CMakeLists.txt file spells out what, if anything, can be found in subdirectories. There are no more ginormous Makefiles. You make the changes you need closest to the code that’s affected.
For example, you can add subdirectories in CMakeLists.txt so they’re part of the cmake path:
# Point to NCS root directory.
set(NRF_DIR ${CMAKE_CURRENT_LIST_DIR} CACHE PATH “NCS root directory”)
include(cmake/extensions.cmake)
include(cmake/multi_image.cmake)
include(cmake/reports.cmake)
zephyr_include_directories(include)
add_subdirectory(ext)
add_subdirectory(lib)
add_subdirectory(samples)
add_subdirectory(subsys)
add_subdirectory(drivers)
add_subdirectory(tests)
Sometimes they’re used to set the directory as a project. This particular one is from the https_client example in nRF Connect SDK.
cmake_minimum_required(VERSION 3.8.2)
find_package(Zephyr REQUIRED HINTS $ENV{ZEPHYR_BASE})
project(https_client)
target_sources(app PRIVATE src/main.c)
In my case, I’ll show you how I used several CMakeLists.txt so the compiler knows about my device drivers!
Kconfig
Kconfig allows you to create project-based configuration parameters. If you’ve ever used Nordic’s Original SDK, you know the pain of their sdk_config.h file. It’s a nightmare.
Like CMakeLists.txt, Kconfig files allow you to keep the configuration as close to your code. There’s no massive top-level configuration manifest to be afraid of. You can add your code without breaking the repository. Good stuff, right?
Here’s an example of a Kconfig from the ncs/nrf/applications/asset_tracker application
menu “Asset tracker”
rsource “src/ui/Kconfig”
config APPLICATION_WORKQUEUE_STACK_SIZE
int “Application workqueue stack size”
default 4096
config APPLICATION_WORKQUEUE_PRIORITY
int “Application workqueue priority”
default SYSTEM_WORKQUEUE_PRIORITY
menu “GPS”
…
You can see that it references separate Kconfig files as a dependency. You can also see that some environment variables are set with default values. You can either add them to your project’s prj.conf or edit them using west build -t menuconfig. If you’re looking to make permanent changes, you should use the prj.conf method.
The most important part about Kconfig files in regards to drivers is that you can use these variables as flags for conditional compilation.
As an example, here’s what the ncs/nrf/drivers/sensor/CMakeLists.txt looks like:
add_subdirectory_ifdef(CONFIG_BH1749 bh1749)
add_subdirectory_ifdef(CONFIG_SENSOR_SIM sensor_sim)
add_subdirectory_ifdef(CONFIG_PMW3360 pmw3360)
add_subdirectory_ifdef(CONFIG_PAW3212 paw3212)
You may notice that all the variables begin with CONFIG_. All variables produced by Kconfig have this prefix. So, for example, APPLICATION_WORKQUEUE_STACK_SIZE becomes CONFIG_APPLICATION_WORKQUEUE_STACK_SIZE.
In the CMakeLists.txt above, you can see that a subdirectory is only added if the driver is “enabled”. CONFIG_BH1749 happens to be the top-level environment variable to make that happen. You can also use this type of conditional compilation for your project code.
zephyr/module.yml
Kconfig and CMakeList.txt are great, but where do we start? How does west know where to start looking for them?
The answer is a very unsuspecting file called module.yml. module.yml is usually found in the /zephyr subdirectory of a dependency. For example, here’s the one for nRF Connect SDK located in ncs/nrf/zephyr/
Example
build:
cmake: .
kconfig: Kconfig.nrf
The file tells west where to find the appropriate base Kconfig and CMakeLists.txt. Those are the starting point for further repository traversal. Without these, there’s no way to use your driver code in your application!
Adding a drivers folder
You now should understand Kconfig, CMakeLists.txt, and module.yml. We’re ready for driver development!
In my case, since my driver work is ongoing, I opted to use my own drivers folder in my main project repository. You can always opt to start developing your drivers in zephyr/drivers. This is likely a better location especially if you want to release the driver for others to use. The downside is that it requires more work!
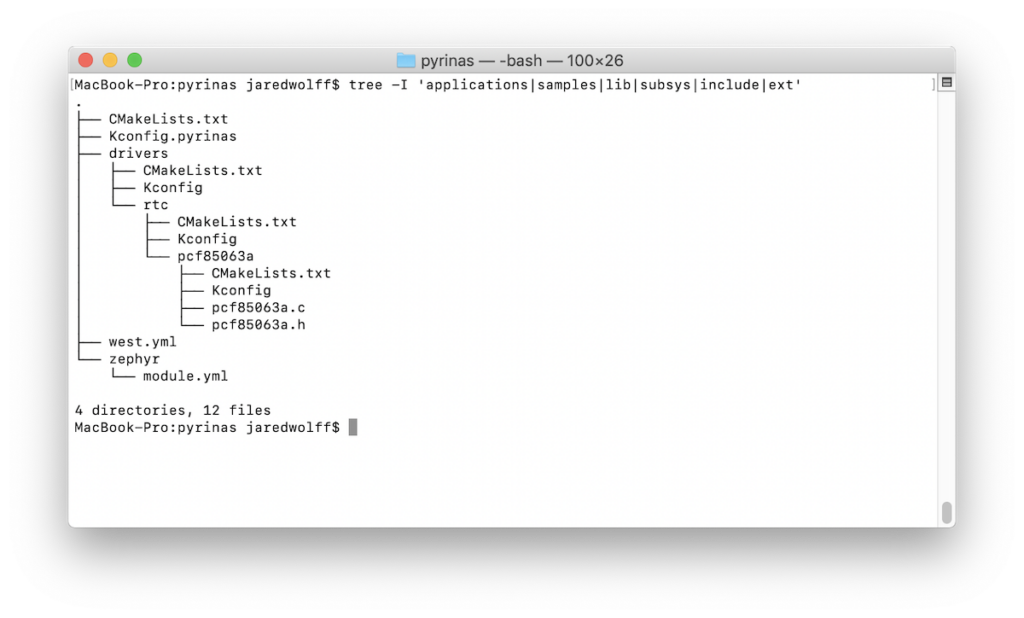
In my case, here’s what the directory structure looks like from my project repo:
. # My Project Root located in /ncs/pyrinas/
├── CMakeLists.txt
├── Kconfig.pyrinas
├── drivers
│ ├── CMakeLists.txt
│ ├── Kconfig
│ └── rtc
│ ├── CMakeLists.txt
│ ├── Kconfig
│ └── pcf85063a
│ ├── CMakeLists.txt
│ ├── Kconfig
│ ├── pcf85063a.c
│ └── pcf85063a.h
├── west.yml
└── zephyr
└── module.yml
You can see there’s a pair of CMakeLists.txt and Kconfig at each level. You don’t have to make a CMakeLists.txt and Kconfig at every level though. For example, if I wasn’t planning on adding any more RTC drivers, I could stop at the rtc folder. You can see an example of this below:
zephyr_library()
zephyr_library_sources_ifdef(CONFIG_PCF85063A pcf85063a/pcf85063a.c)
In my case though, I opted to define CMakeLists.txt and Kconfig at every level.
Full Example
Below are all of the KConfig and CMakeLists.txt files that are part of my project, along with their relative project path.
ncs/pyrinas/CMakeLists.txt
#
# Copyright (c) 2020 Circuit Dojo
#
# SPDX-License-Identifier: Apache-2.0
#
# Point to Pyrinas root directory.
set(PYRINAS_DIR ${CMAKE_CURRENT_LIST_DIR} CACHE PATH “Pyrinas root directory”)
zephyr_include_directories(include)
add_subdirectory(lib)
add_subdirectory(ext)
add_subdirectory(drivers)
ncs/pyrinas/drivers/CMakeLists.txt
#
# Copyright (c) 2020 Circuit Dojo LLC
#
# SPDX-License-Identifier: Apache-2.0
#
add_subdirectory(rtc)
ncs/pyrinas/drivers/rtc/CMakeLists.txt
add_subdirectory_ifdef(CONFIG_PCF85063A pcf85063a)
ncs/pyrinas/drivers/rtc/pcf86063a/CMakeLists.txt
zephyr_library()
zephyr_library_sources_ifdef(CONFIG_PCF85063A pcf85063a.c)
The Kconfig files follow a very similar pattern. You can use the same pattern for your projects as well.
ncs/pyrinas/Kconfig.pyrinas
menu “Pyrinas”
rsource “lib/Kconfig”
rsource “drivers/Kconfig”
endmenu
Side note: The Kconfig in a module’s root doesn’t need a suffix. I chose to add .pyrinas to be consistent with the nRF Connect Studio and Zephyr repo. Make sure whatever you use is reflected in zephyr/module.yml.
ncs/pyrinas/drivers/Kconfig
comment “Device Drivers”
rsource “rtc/Kconfig”
ncs/pyrinas/drivers/rtc/Kconfig
comment “RTC Drivers”
rsource “pcf85063a/Kconfig”
ncs/pyrinas/drivers/rtc/pcf85063a/Kconfig
# PCF85063A Nano Power Real time Clock configuration options
menuconfig PCF85063A
bool “PCF85063A Three Axis Accelerometer”
depends on (I2C && HAS_DTS_I2C)
help
Enable SPI/I2C-based driver for PCF85063A based RTC
As you can imagine, it’s more complicated when your drivers are many levels deep. In any case, the above example should give you an idea of how to organize your Kconfig and CMakeLists.txt.
Don’t forget the Device Tree
In Zephyr, the Device Tree dictates hardware access. Gone are the days of initializing the driver in main. Instead, you must use references to the Device Tree to access peripherals.
In my case, I needed to use I2C to get the PCF85063A working. Here’s what the nRF9160 Feather’s Device Tree looks like before I added the PCF85063A:
&i2c1 {
compatible = “nordic,nrf-twim”;
status = “okay”;
sda-pin = <26>;
scl-pin = <27>;
};
Here’s what it looked like after:
&i2c1 {
compatible = “nordic,nrf-twim”;
status = “okay”;
sda-pin = <26>;
scl-pin = <27>;
pcf85063a@51 {
compatible = “nxp,pcf85063a”;
label = “PCF85063A”;
reg = <0x51>;
};
};
I got my inspiration from the drivers for the bh1749 driver in the nRF Connect SDK. You can see how Nordic implemented it in thingy91_nrf910_common.dts. (Github link)
You can see that the address of the PCF85063A address of 0x51 is in two places. As the reg value is what the driver uses whereas the @51 is a naming convention. This allows you to have two or more of the same device without interference. (Granted they’re operating at different hardware addresses!)
The compatible entry references the code in pcf85063a.c. This value must be unique. We’ll discuss this a bit more in a second.
The label allows us to use the device tree macros to reference the hardware.
As with any device, your driver may look different. The Zephyr project is full of example driver implementations. You can check out more in the nrf/drivers/ folder and also the zephyr/drivers folder.
Driver Smarts
Now that you’re configured and your Device Tree is set, it’s time to write some code! In this section, we’ll review the important macros and nuances of driver development.
Helpers
Who doesn’t like a handy macro that makes life easier? I found that the macros like BIT and BIT_MASK were extra useful. They’re located in zephyr/include/sys/util.h Here’s what it looks like for the CTRL1 register of the PCF85063A
#ifndef ZEPHYR_DRIVERS_RTC_PCF85063A_PCF85063A_H_
#define ZEPHYR_DRIVERS_RTC_PCF85063A_PCF85063A_H_
#define PCF85063A_CTRL1 0x00
#define PCF85063A_CTRL1_EXT_TEST BIT(7)
#define PCF85063A_CTRL1_STOP BIT(5)
#define PCF85063A_CTRL1_SR BIT(4)
#define PCF85063A_CTRL1_CIE BIT(2)
#define PCF85063A_CTRL1_12_24 BIT(1)
#define PCF85063A_CTRL1_CAP_SEL BIT(0)
Though these macros don’t do too much, they keep your code clean and easy to read.
DEVICE_AND_API_INIT
The DEVICE_AND_API_INIT macro adds the initialization of your driver before any user code. Here’s what the setup looks like for the PCF85063A:
DEVICE_AND_API_INIT(pcf85063a, DT_INST_LABEL(0), pcf85063a_init, &pcf85063a_data,
&pcf85063_cfg_info, POST_KERNEL, CONFIG_I2C_INIT_PRIORITY,
&pcf85063a_driver_api);
If we look closer at the definition, we can see what each entry does:
#define DEVICE_AND_API_INIT(dev_name, drv_name, init_fn, data, cfg_info, \
level, prio, api) \
This allows the bulk of this private code to remain private. It’s only accessible through a shared API struct. In my case, it was the pcf85063a_driver_api. We’ll talk more about device APIs more shortly.
You can also change when the driver gets initialized by changing the level argument. Here are the levels as shown in linker-defs.h:
#define INIT_SECTIONS() \
__init_start = .; \
CREATE_OBJ_LEVEL(init, PRE_KERNEL_1) \
CREATE_OBJ_LEVEL(init, PRE_KERNEL_2) \
CREATE_OBJ_LEVEL(init, POST_KERNEL) \
CREATE_OBJ_LEVEL(init, APPLICATION) \
CREATE_OBJ_LEVEL(init, SMP) \
__init_end = .; \
In most cases, POST_KERNEL is good enough. If you need immediate initialization, then one of the PRE_KERNEL options is better.
DT_DRV_COMPAT
This is a particularly important macro. It ties the compatible line in your Device Tree to the driver itself. Without this, we wouldn’t be able to use macros like DT_INST_LABEL(0) to get the label of the device.
In my case, I defined DT_DRV_COMPAT as
#define DT_DRV_COMPAT nxp_pcf85063a
This aligns with the compatible = “nxp,pcf85063a”; set in the Device Tree. (Replacing a , with _)
Find an API that suits your needs
Initialization is great, but how the heck do we use the driver. This is where a driver API comes into play.
In the zephyr/include/drivers directory, you can find all the API level code for every conceivable driver in Zephyr. In some cases, the API for your device may be there. In other cases, it may not be. The counter_driver_api seemed to be the best fit for the PCF85063A. Unfortunately, this API doesn’t have any hooks for the clock functionality.
When you use a higher-level API, you write static functions that match the API you’re working with. You pass the functions into an API struct and then on to the DEVICE_AND_API_INIT macro.
That was a mouthful. Let’s see what it actually looks like:
static const struct counter_driver_api pcf85063a_driver_api = {
.start = pcf85063a_start,
.stop = pcf85063a_stop,
.get_value = pcf85063a_get_value,
.set_alarm = pcf85063a_set_alarm,
.cancel_alarm = pcf85063a_cancel_alarm,
.set_top_value = pcf85063a_set_top_value,
.get_pending_int = pcf85063a_get_pending_int,
.get_top_value = pcf85063a_get_top_value,
.get_max_relative_alarm = pcf85063a_get_max_relative_alarm,
};
Implementing a function looked something like this:
static int pcf85063a_start(struct device *dev)
{
// Get the data pointer
struct pcf85063a_data *data = pcf85063a_dev->driver_data;
// Turn it back on (active low)
uint8_t reg = 0;
uint8_t mask = PCF85063A_CTRL1_STOP;
// Write back the updated register value
int ret = i2c_reg_update_byte(data->i2c, DT_REG_ADDR(DT_DRV_INST(0)),
PCF85063A_CTRL1, mask, reg);
if (ret)
{
LOG_ERR(“Unable to stop RTC. (err %i)”, ret);
return ret;
}
return 0;
}
If you check out counter.h you can see how you can implement your static functions:
typedef int (*counter_api_start)(struct device *dev);
typedef int (*counter_api_stop)(struct device *dev);
typedef int (*counter_api_get_value)(struct device *dev, u32_t *ticks);
typedef int (*counter_api_set_alarm)(struct device *dev, u8_t chan_id,
const struct counter_alarm_cfg *alarm_cfg);
typedef int (*counter_api_cancel_alarm)(struct device *dev, u8_t chan_id);
typedef int (*counter_api_set_top_value)(struct device *dev,
const struct counter_top_cfg *cfg);
typedef u32_t (*counter_api_get_pending_int)(struct device *dev);
typedef u32_t (*counter_api_get_top_value)(struct device *dev);
typedef u32_t (*counter_api_get_max_relative_alarm)(struct device *dev);
typedef u32_t (*counter_api_get_guard_period)(struct device *dev, u32_t flags);
typedef int (*counter_api_set_guard_period)(struct device *dev, u32_t ticks,
u32_t flags);
__subsystem struct counter_driver_api {
counter_api_start start;
counter_api_stop stop;
counter_api_get_value get_value;
counter_api_set_alarm set_alarm;
counter_api_cancel_alarm cancel_alarm;
counter_api_set_top_value set_top_value;
counter_api_get_pending_int get_pending_int;
counter_api_get_top_value get_top_value;
counter_api_get_max_relative_alarm get_max_relative_alarm;
counter_api_get_guard_period get_guard_period;
counter_api_set_guard_period set_guard_period;
};
Repeat the process for all the API related functions from your __subsystem struct and you’ll be good to go!
Using your driver in code
You’ve created a Device Tree entry and you’ve picked an API. You’ve sprinkled CMakeLists.txt and Kconfig throughout your code. It’s time to use your driver!
First, you’ll likely want to include the high-level API to your app. Here was my include to the counter API:
#include <drivers/counter.h>
During the early stages of your app, you can fetch your device. Using the label defined in your Device Tree, use the device_get_binding function call.
// Get the device
rtc = device_get_binding(“PCF85063A”);
if (rtc == NULL)
{
LOG_ERR(“Failed to get RTC device binding\n”);
return;
}
LOG_INF(“device is %p, name is %s”, rtc, log_strdup(rtc->name));
This allows you to fetch the context and API access to do all the things! Instead of accessing the PCF85063A functions, you’ll use the public API calls.
In my case, my code uses the counter_get_pending_int and counter_cancel_channel_alarm functions.
if (!timer_flag)
{
int ret = counter_get_pending_int(rtc);
LOG_INF(“Interrupt? %d”, ret);
if (ret == 1)
{
timer_flag = true;
int ret = counter_cancel_channel_alarm(rtc, 0);
if (ret)
{
LOG_ERR(“Unable to cancel channel alarm!”);
}
}
}
This abstracts your hardware. That way you can use this code with any other counter_api capable device. If you want to switch it up, change the name passed to device_get_binding and you’ll be golden.
Only the tip of the iceberg
In this article, we talked about what makes a driver in Zephyr, a driver. You’ve learned how to add entries to your Device Tree. You’ve learned how to organize your repository. You’ve learned how to take advantage of some of Zephyr’s pre-existing APIs. You’re now ready to tackle your drivers!
Curious about the nRF9160 Feather? It’s open-source and is available for pre-order this week!
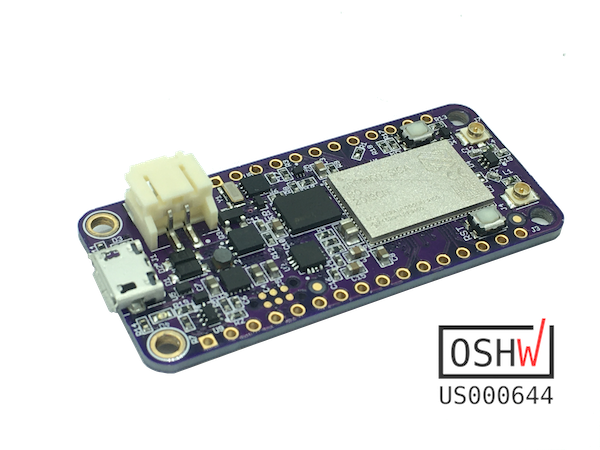
nRF9160 Feather + OSHWA
You can check it out here.
See anything you’d like to change? Submit a pull request or open an issue at GitHub.
{:.no_toc} ## References