Written by Jared Wolff, Hardware and firmware enthusiast and proud father of the nRF9160 Feather.
This blog originally ran on Jared’s blog. For more content like this, visithttps://www.jaredwolff.com/blog/.
The Internet of Things landscape is constantly changing. New devices, new protocols, and new providers are popping up every day. One new service that i’m excited about is Golioth. So much so that I’ve partnered with them to make the nRF9160 Feather as a reference device for the platform!
Golioth wants to be the go-to IoT infrastructure for any project spanning across operating systems and languages. The idea being, if your device has a link to the internet, it can work with Golioth.
They’re utilizing some technologies that I’ve been a fan of for a long while including CoAP over DTLS and CBOR. While the IoT world has been slow to pick up on these technologies, Golioth’s adoption will surely help speed things up!
In this post, i’ll be discussing how to get Golioth working with the nRF9160 Feather on Zephyr. We’ll be focusing on getting GPS sensor data and publishing it while using Golioth’s LightDB to control update interval and more.
Side note: Golioth is currently in open beta. You can sign up at their site: https://golioth.io. Make sure you let them know I sent you. 😊
Let’s get started!
Getting Started
Golioth is currently in open beta. All of their instructions are located here. I’ll be adopting their instructions for using the nRF9160 Feather. All the code from this demo is located on Github here.
Setting up your repository
Note: if you’re already familiar with the setup of this example you can skip to the next section of this post!
- Create a working folder for this demo
cd path/where/you/want/things/ mkdir golioth-demo cd golioth-demo - Create a virtual environment. (It’s recommended to install Python 3.9 or newer before starting)
virtualenv -p python3 envNote you may also have to install
virtualenvbefore running the above command. Simply runpip install virtualenvand you’ll be good to go! - Activate the environment by running:
source env/bin/activateOn windows things are similar but instead you’ll be running this like so:
.\env\Scripts\activateNote: this may differ depending on your system. The above will work with most
bashterminals. - Install
westpip3 install west - Pull Zephyr and the necessary Nordic dependencies
west init -m https://github.com/circuitdojo/golioth-demo.git --manifest-rev main - Once cloned you can change directories to
golioth-demoand runwest updateand this will begin the download of all necessary dependencies.west updateNote: This update can take up to 10 minutes, depending on internet speed.
- Then install all the remaining python requirements:
pip install -r zephyr/scripts/requirements.txt - Sign up to download Nordic’s SUPL library here. Then, install using the instructions provided with the download package.Note: If you’re not familiar, the SUPL library download supplemental GPS data from Google’s SUPL server which increases the speed of getting a GPS fix. Without it it takes a much longer time (>60 seconds) to get a first fix.
- Install the ARM GCC toolchain
- For Linux users, you can use the Zephyr SDK, which contains the required build files.
- For Mac run the following:
cd ~
wget "https://developer.arm.com/-/media/Files/downloads/gnu-rm/9-2019q4/gcc-arm-none-eabi-9-2019-q4-major-mac.tar.bz2"
tar xvfj gcc-arm-none-eabi-9-2019-q4-major-mac.tar.bz2
rm gcc-arm-none-eabi-9-2019-q4-major-mac.tar.bz2
**Note** for Catalina users you will get an error when running these utilities for the first time. You must allow them to be executed in your Security preferences.  - For Windows you can download and install the toolchain with this direct link.
Nice! You’ve downloaded and installed all the necessary bits to get this example working. In the next section, we’ll work on provisioning your device’s PSK so it can connect to Golioth.
Provisioning your device
There are a few ways of setting up a device. In this post we’ll focus on creating a device using Golioth’s CLI interface.
- Download
goliothctlvia the download page - One installed you can check out all the functionality that is built into the CLI:
❯ goliothctl
The goliothctl CLI manages authentication, developer workflow, interactions with the platform, local configuration and more.

Usage:
  goliothctl [flags]
  goliothctl [command]

Examples:
# List Projects
goliothctl project list

# Set current project
goliothctl config set projectId my-first-project

# List devices
goliothctl device list

# Provision device and credentials
goliothctl provision --hwId "DE:AD:BE:EF" --name "My first device" --credId "deadbeef-id"  --psk "supersecret"

Available Commands:
  apikeys     Access API Keys information.
  config      The `goliothctl config` subcommands are used to get and set values in the current local goliothctl config.
  device      Use the `goliothctl device` subcommands to add, remove, list, and update data associated with devices.
  help        Help about any command
  lightdb     Access data on Light DB
  login       Authenticate with Golioth manually.
  logout      Log out of Golioth manually.
  logs        Show device logs (from the last 4h by default)
  project     Access and manage project information.
  provision   Create a device and provision it with credentials.
  stream      Access the data in a LightDB Stream.
  tag         Create, update, and delete tags.
  updates     Trigger device updates.
  version     Show CLI Version

Flags:
      --apiUrl string      golioth api server url (default "https://api.golioth.dev")
  -c, --config string      config file (default is $HOME/.golioth/.goliothctl.yaml)
  -h, --help               help for goliothctl
      --projectId string   golioth project id

Use "goliothctl [command] --help" for more information about a command.
There is a ton here. We’re going to focus on provisioning this device (
provisioncommand) and getting data. (usinglightdb) But first let’s login: goliothctl loginactivates your web browser and allows you to use the same credentials as used for the Golioth console. As of August 2021, only Beta members will be able to log in or continue from here. Sign up for the beta or email beta@golioth.io for more information on getting started.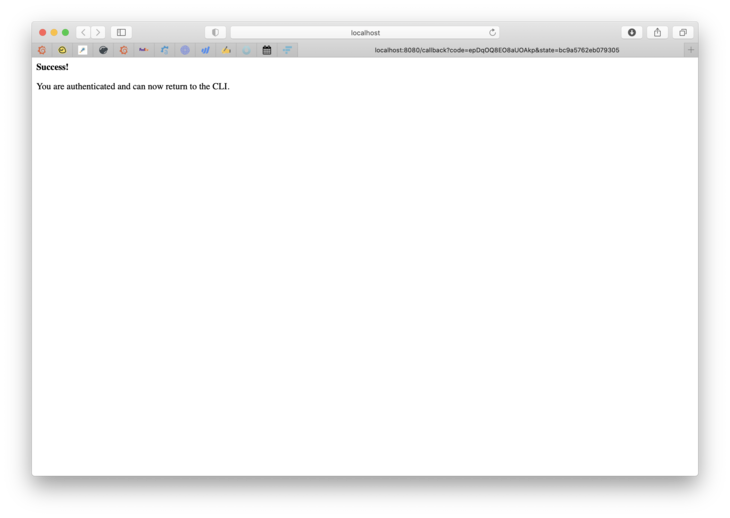
- Once logged in, you can start using Golioth with your device! First let’s create a device. s
❯ goliothctl device create --hwId "1234" --name "Golioth nRF9160 Feather Demo"

id:"<YOUR ID>" hardware_ids:"1234" name:"Golioth nRF9160 Feather Demo"
Note: this is an example but you’ll need to use a unique hardware ID and unique name for your device. I recommend using the nRF9160 IMEI for the
hwIdentry. Future versions ofgoliothctlwill not requirehwId.This will generate an id which you can use in the next provision step.
- Next, let’s get a PSK and ID for the nRF9160 Feather.
❯ goliothctl provision --id <YOUR ID> --credId "<YOUR IMEI>" --psk "super secret password" created - Typically you would hard code the credential ID and PSK using a
.conffile. Since we’re using the SUPL client we need to store them in the secure credential store built into the nRF9160. Since the credential store requires your PSK stored in a hex string format, let’s convert it first:❯ echo "super secret password" | tr -d '\n' | xxd -ps -c 200 7375706572207365637265742070617373776f7264 - Now that we have what we need, we need to load the credentials using a firmware that has the AT console enabled.
at_clientcan be used for this purpose:cd nrf/samples/nrf9160/at_client west build -b circuitdojo_feather_nrf9160ns nrfjprog --program build/zephyr/zephyr.hex --chiperase --reset - Then opening a terminal or LTE Link Monitor you can execute the following commands:
AT+CFUN=4
AT%CMNG=0,1,4,"<DEVICE IMEI>"
AT%CMNG=0,1,3,"<HEX STRING PSK>"
AT+CFUN=0
Make sure you enter the device IMEI and hex string PSK exactly otherwise your device will fail to authenticate with Golioth!

Hello world
If you’ve made it this far, congrats. You definitely get a gold star ⭐️. While setting up a project may be difficult right now, everyone in the Zephyr and Golioth community looks forward to more tools that will make this setup trivial.
Now that it is setup, let’s get to the good stuff: talking to the cloud!
On connecting to Golioth, the demo code publishes the current UTC time to the LightDB boot entry. You can check it with the command below:
goliothctl lightdb get --id <YOUR ID> boot
<YOUR ID> is the ID generated in step 4 earlier. You can also get a list of all your devices (and IDs) by running:
❯ goliothctl device list
id:"<YOUR ID>"  hardware_ids:"<YOUR IMEI>"  name:"Golioth nRF9160 Feather Demo"
If everything is working properly you should get a UTC timestamp:
❯ goliothctl lightdb get --id <YOUR ID> boot
{"ts":1627410945880}
Nice! We’re talking to Golioth’s servers!
Behind the curtain
Now, let’s see how it’s done!
First, i’m using an application-wide event manager and it’s being serviced by the main thread. Events can be generated anywhere within Zephyr and can be safely stowed (atomically) away into a message queue where they can be retrieved later.
When a “connected” event happens there is a few things that happen:
- Get the time
- Encode the time
- Publish to LightDB
Lets take a look at each
Get the time
The nRF Connect SDK has a great date_time library which is extremely useful for getting the latest time directly from the cellular towers. You can then check the time anytime you want using date_time_now().
err = date_time_now(&ts);
if (err)
{
	LOG_ERR("Unable to get current date/time. Err: %i", err);
}
A pointer to a uint64_t is passed to date_time_now in order to get the current time. If the operation fails, the return value should be checked.
Encoding the boot data
The data by itself is not very useful. So I use the amazing power of CBOR to encode that data and prepare it to be sent via Golioth. In this example, i’m using QCBOR since its APIs are a bit more friendly. Here’s what it looks like:
int app_codec_boot_time_encode(uint64_t time, uint8_t *p_buf, size_t buf_len, size_t *p_size)
{
    // Setup of the goods
    UsefulBuf buf = {
        .ptr = p_buf,
        .len = buf_len};
    QCBOREncodeContext ec;
    QCBOREncode_Init(&ec, buf);

    /* Create over-arching map */
    QCBOREncode_OpenMap(&ec);

    /* Add timetstamp */
    QCBOREncode_AddUInt64ToMap(&ec, "ts", time);

    /* Close map */
    QCBOREncode_CloseMap(&ec);

    /* Finish things up */
    return QCBOREncode_FinishGetSize(&ec, p_size);
}
CBOR is extremely flexible and you can organize your data however you’d like. In my case i’m creating the equivalent of {"ts":<TIMESTAMP>} in JSON.
I’m also a big fan of packing my CBOR. This can be done using function calls like QCBOREncode_AddUInt64ToMapN. This allows you to use an index rather than a string as the key in your encoded data. As long as your decoder understands packed CBOR, you’ll save some serious bytes! (Which translates to $ for cellular connections!)
See cbor/cbor_encode.h for all the options when using QCBOR.
Publishing to LightDB
Publishing to LightDB is as simple as running golioth_lightdb_set.
err = golioth_lightdb_set(client,
							GOLIOTH_LIGHTDB_PATH("boot"),
							COAP_CONTENT_FORMAT_APP_CBOR,
							buf, size);
if (err)
{
	LOG_WRN("Failed to gps data: %d", err);
}
You’ll notice that i’ve set a path to “boot”. Also, you’ll see that Golioth takes several different payload types including CBOR and JSON. This can give your application total flexibility how you want to send your data. (Nicceeee 💪)
GPS Sensor Data
Similarly, if you let the demo run long enough, you’ll notice that the nRF9160 Feather is attempting to get a GPS fix. Depending on the weather and other factors this may take seconds or minutes. Once a fix is achieved, the positional data is packaged up and pushed to Golioth.
Here’s an example output from checking using goliothctl
❯ goliothctl lightdb get --id <YOUR ID> gps
{"lat":41.283409046551846,"lng":-72.81037240012303,"ts":1627413103000}
Every time you get a fix (currently set to 60 seconds) the nRF9160 will update LightDB with the latest location information.
Handy, no?
In the code
Here’s what the APP_EVENT_GPS_DATA looks like:
case APP_EVENT_GPS_DATA:
{
	uint8_t buf[256];
	size_t size = 0;
	struct app_codec_gps_payload payload;
	payload.timestamp = 0;

	/* Get the current time */
	err = date_time_now(&payload.timestamp);
	if (err)
	{
		LOG_WRN("Unable to get timestamp!");
	}

	/* Set the data */
	payload.p_gps_data = evt.gps_data;

	/* Encode CBOR data */
	err = app_codec_gps_encode(&payload, buf, sizeof(buf), &size);
	if (err < 0)
	{
		LOG_ERR("Unable to encode data. Err: %i", err);
		goto app_event_gps_data_end;
	}

	LOG_INF("Data size: %i", size);

	/* Publish gps data */
	err = golioth_lightdb_set(client,
							  GOLIOTH_LIGHTDB_PATH("gps"),
							  COAP_CONTENT_FORMAT_APP_CBOR,
							  buf, size);
	if (err)
	{
		LOG_WRN("Failed to gps data: %d", err);
	}

app_event_gps_data_end:

	/* Free the data generated before */
	k_free(evt.gps_data);

	break;
}
You can see it’s similarly structured compared to the initial boot message. The main difference being we’re using the GPS data that gets generated by the GPS module.
Here’s what’s generated by the GPS module for your use in the application:
struct gps_pvt {
	double latitude;
	double longitude;
	float altitude;
	float accuracy;
	float speed;
	float heading;
	float pdop;
	float hdop;
	float vdop;
	float tdop;
	float gdop;
	struct gps_datetime datetime;
	struct gps_sv sv[GPS_PVT_MAX_SV_COUNT];
};
You can see that i’ve taken advantage of the latitude and longitude but there are many other parameters that are extremely handy. The encoder can be updated to add any of these other parameters as your application sees fit.
One important note: I don’t use the gps_datetime from the GPS module itself since it’s not easily computed to a uint64_t timestamp. It is particularly handy if you want to generate a string representation of the timestamp:
struct gps_datetime {
	uint16_t year;
	uint8_t month;
	uint8_t day;
	uint8_t hour;
	uint8_t minute;
	uint8_t seconds;
	uint16_t ms;
};
Once you have the data and it’s encoded, we use the same golioth_lightdb_set function. The main difference being we’re using the gps path.
In the end you have a reliable store of the latest GPS location saved across both cloud and device. Awesome, right?
Just getting started
This demo was just a small slice of how Golioth wants to make developing IoT infrastructure easier across many platforms. While they support Zephyr today, I’m particularly excited for future embedded Rust support.
While early in the development process, the CLI, web console and device API functionality has been great to use and I’m excited for more functionality and features in the future! As I mentioned at the start of this post, you can get early access to the Beta at https://golioth.io. Early access folks also get access to the Discord where we meet up weekly to talk about features, improvements and more. See you there!

This post showcases the nRF9160 Feather which is available on my store, GroupGets, Digikey and Tindie. help support open hardware by consider grabbing one and joining the fun! ⚙️❤️
The source code related to this post can be found here.
Thanks to the one and only Chris Gammell and Jonathan Berri for their input on this post!