Written By Ali Aljaani, member of the Zephyr Project Marketing Committee and Developer Marketing Manager at Nordic Semiconductor
This article originally ran on the Nordic DevZone website. For more content like this, click here.
Low-power Wi-Fi 6 is here running on Nordic silicon! Nordic’s customers have patiently awaited the arrival of a long-sought-after Wi-Fi solution. The combination of Nordic Semiconductor’s long-standing expertise in low-power wireless technology and the recent advancements in low-power Wi-Fi have us thrilled for the future of battery-powered IoT devices. By leveraging our extensive experience in ultra-low-power wireless and maximizing the low-power capabilities of Wi-Fi, we bring innovative solutions to a wide range of applications including, but not limited to: Internet of Things (IoT), Smart Home applications, Industrial IoT sensors and controllers, Sports and Fitness, Wireless Payment Terminals and Medical.
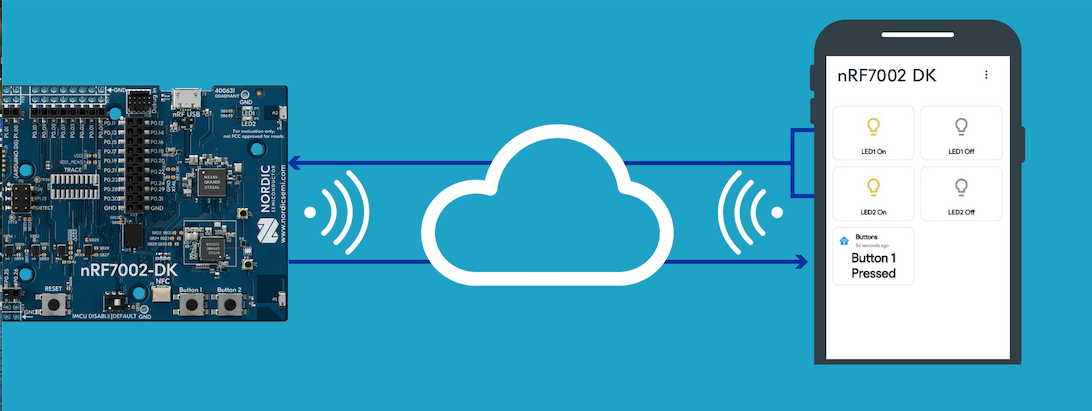
This blog post will get you up and running with the nRF7002 Development Kit (DK). First, we will show you how to securely connect your nRF7002 DK to your Wi-Fi network. Then, how to establish bidirectional communication over Wi-Fi between an MQTT client running on the nRF7002 DK and another MQTT client, running on a PC, tablet or smartphone, which enables you to control/monitor the board remotely. For this demonstration, we will control the LEDs and monitor the buttons on the nRF7002 DK remotely over Wi-Fi.
We will be using a mobile app called MQTT Dashboard to interact with the board remotely. You can use any MQTT client of your preference as explained later in the blog post.
Developing Wi-Fi applications on the nRF7002 DK
The nRF7002 DK combines the Wi-Fi 6 capabilities of the nRF7002 companion Integrated Circuit (IC) with the multi-protocol capabilities of the nRF5340 System on Chip (SoC), like Bluetooth LE, Bluetooth mesh, NFC, Matter, Thread, Zigbee, etc.
The nRF7002 is a low-power Wi-Fi 6 companion IC with integrated RF supporting dual-band 2.4 GHz and 5 GHz. It is designed with optimal coexistence with Bluetooth LE in mind.
The nRF7002 implements the Physical (PHY) and Medium Access Controller (MAC) layers of the Wi-Fi stack, while the higher layers of the networking stack can run on a host device. In the case of the nRF7002 DK, the host is the powerful dual-core nRF5340 SoC. The nRF5340 SoC also runs the nRF7002 driver and interfaces with the nRF7002 via QSPI as shown in the figure below:

The nRF Connect SDK which is based on the Zephyr RTOS offers a rich set of options for a Wi-Fi application.
For instance, you can use TCP or UDP sockets, or you can add additional overhead but also get the benefits by using application protocols like Constrained Application Protocol (CoAP), Lightweight M2M (LWM2M), MQTT, or Hypertext Transfer Protocol Secure (HTTPS) as shown in the diagram above. In this blog post, we will be using MQTT which uses TCP/IP internally.
Hardware Requirements
- An nRF7002 Development Kit
- A smartphone or tablet
- A PC
Software Requirements
- nRF Connect SDK*
- Visual Studio Code with nRF Connect for VS Code extension*
- Protocol Buffers*
- nRF Wi-Fi Provisioner mobile app (Android or iOS)
- MQTT Dashboard (Android) or any other MQTT client
*Note: you can skip these software requirements and simply flash the binary on the nRF7002 DK
Demo Steps
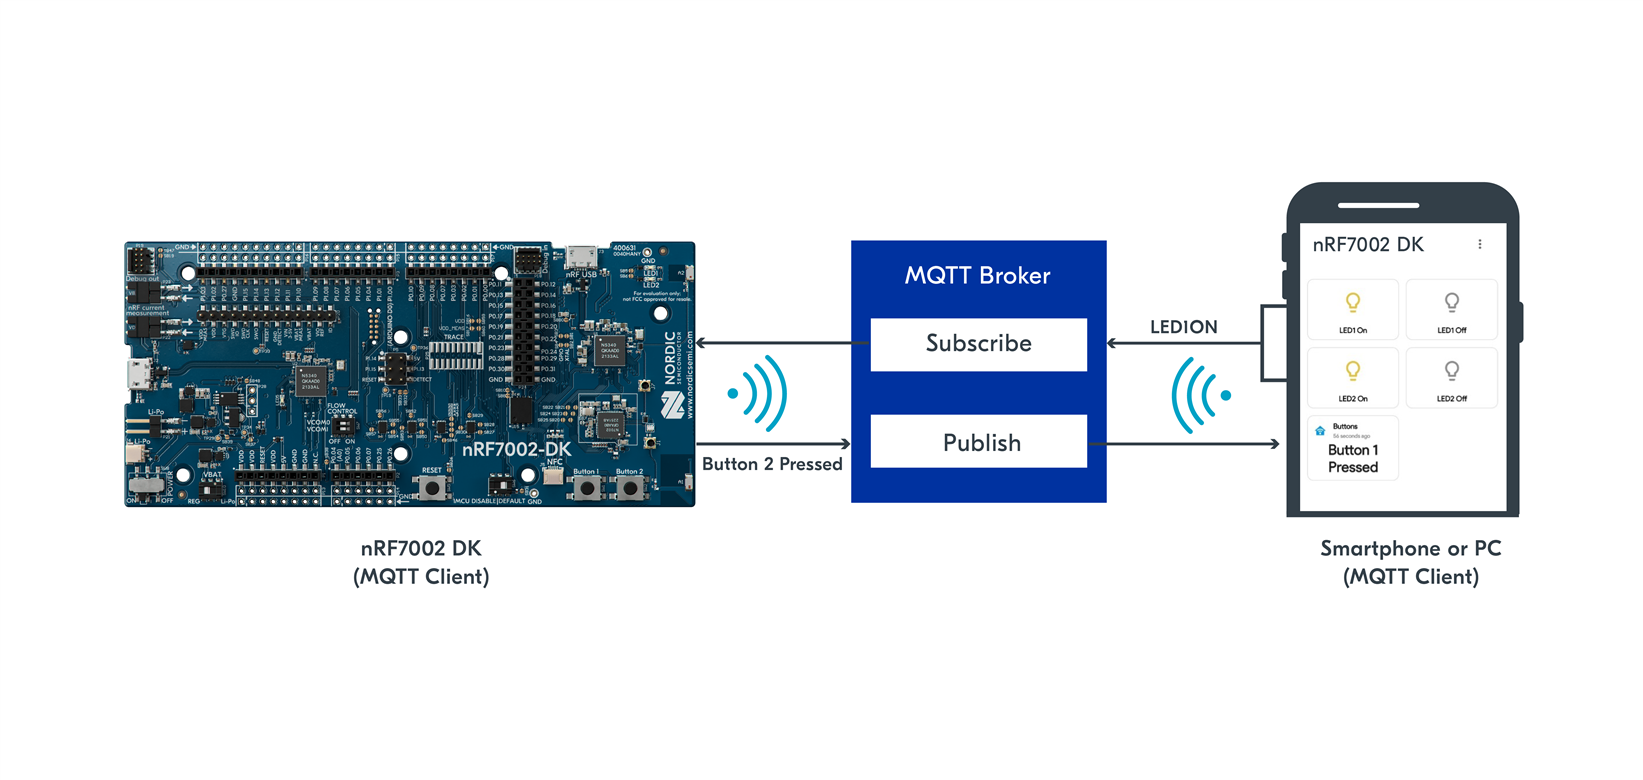
As mentioned in the introduction, this demo consists of an nRF7002 DK, an MQTT broker and a MQTT client on the other end, that can be a smartphone, tablet or PC. The DK will publish to a predetermined MQTT topic whenever either button 1 or button 2 is pressed. It will also subscribe to another predetermined MQTT topic, and turn LED1 or LED2 either on or off based on control commands. This way the MQTT client on the other side can subscribe to the topic that the DK is publishing to, and publish to the topic the DK is subscribed and be able to remotely monitor and control the buttons and LEDs. The following diagram is an overview of the communication flow.
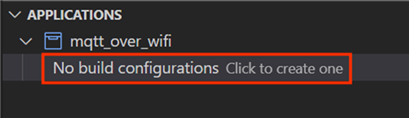
Stage 1: Flash the demo application to your board
Build the demo application and flash it on your nRF7002 DK. Alternatively, you can simply just flash the provided binary file. The demo source code and the binary file can be downloaded from here .
Option A: Build from source code
The MQTT over Wi-Fi demo uses the provisioning service which allows you to provision your Wi-Fi access point/router through a mobile application over Bluetooth LE. To compile the provisioning service, you need the Protocol Buffers to be installed on your machine. The installation link is here: https://github.com/protocolbuffers/protobuf/releases . Select the installation that machines your operating system.
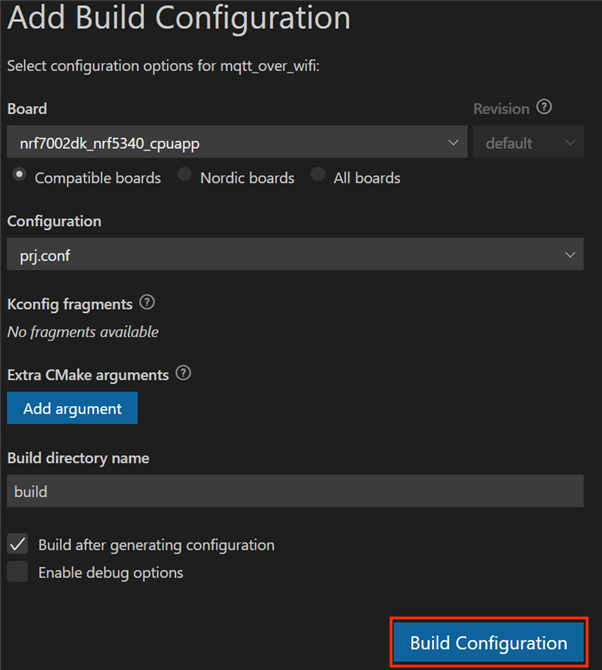
Once you have Protocol Buffers installed on your machine, add a build configuration for the nrf7002dk_nrf5340_cpuapp target, and build the application as shown below:
As you can see from the build target nrf7002dk_nrf5340_cpuapp, the nRF7002 DK firmware (which includes our custom code, the provisioning code, the MQTT library, the whole TCP/IP stack, and the nRF7002 driver) will be running on the host, which is the application core of the nRF5340 SoC. The nRF5340 SoC communicates with the nRF7002 Wi-Fi 6 Companion IC, which implements the Wi-Fi baseband (MAC layer & Physical layer) via QSPI. Side note: the network core on the nRF5340 SoC will be running the Bluetooth LE controller.
Once the firmware is built, you can flash it from nRF Connect for VS Code.
Option B: Flash the binary files
Alternatively, you can simply flash the binary file (also available in the /hex directory of the GitHub repositry) using the Programmer app in nRF Connect for Desktop .
Stage 2: Provision the nRF7002 DK to your access point/router
You need to do this step only once.
The first time you operate the nRF7002 DK, you need to provision it to your access point/router. In other words, you need to provide the credentials of your Wi-Fi network to the nRF7002 DK. For that, we will use the nRF Wi-Fi Provisioner mobile application (Android and iOS). The nRF Wi-Fi Provisioner mobile application uses Bluetooth LE to communicate with the nRF7002 DK. It will display the available Wi-Fi networks and give the option to connect to them. It also allows you to un-provision or re-provision your development kit to a different Wi-Fi network. The nRF5340 SoC on the nRF7002 DK will act as a Bluetooth LE peripheral and your smartphone or tablet will act as a Bluetooth LE central.
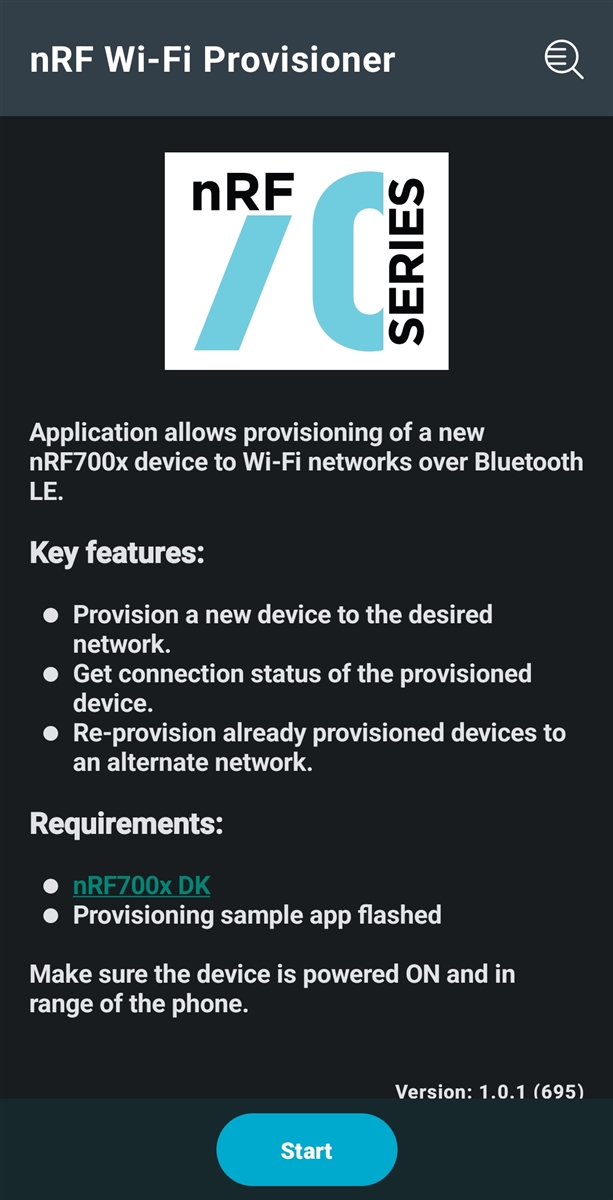
1. Install the nRF Wi-Fi Provisioner mobile app on your smartphone or tablet.
You can do that by simply searching & installing nRF Wi-Fi Provisioner in the Play Store or App Store .
2. Open the nRF Wi-Fi Provisioner mobile app on your smartphone or tablet and press Start.
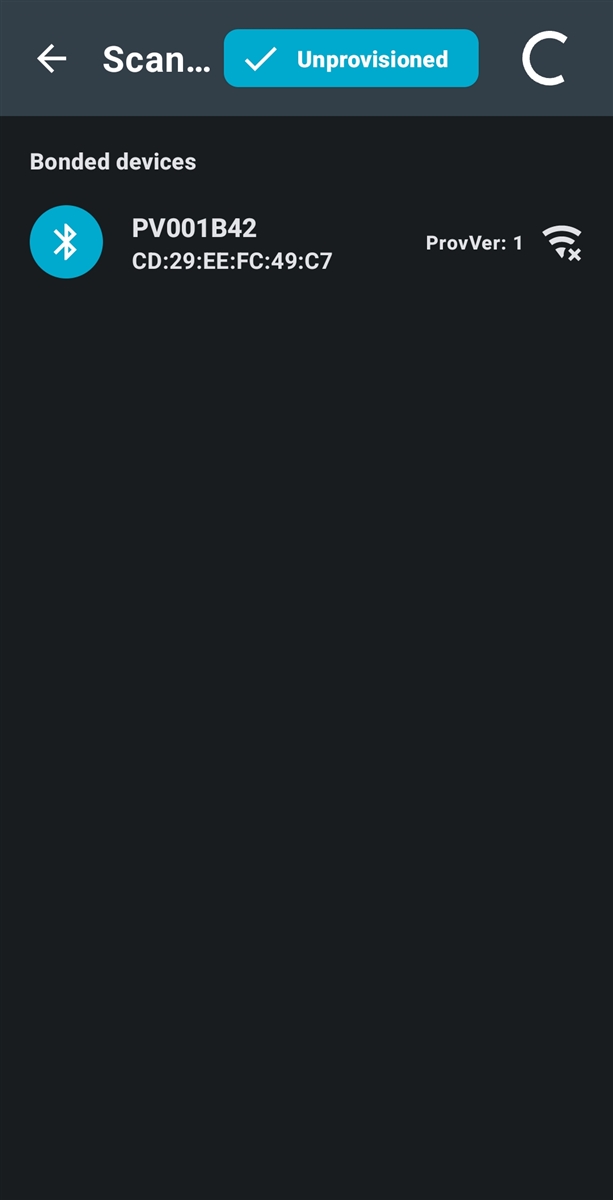
3. Scan for Unprovisioned devices.
Your nRF7002 DK will be listed, press on it.
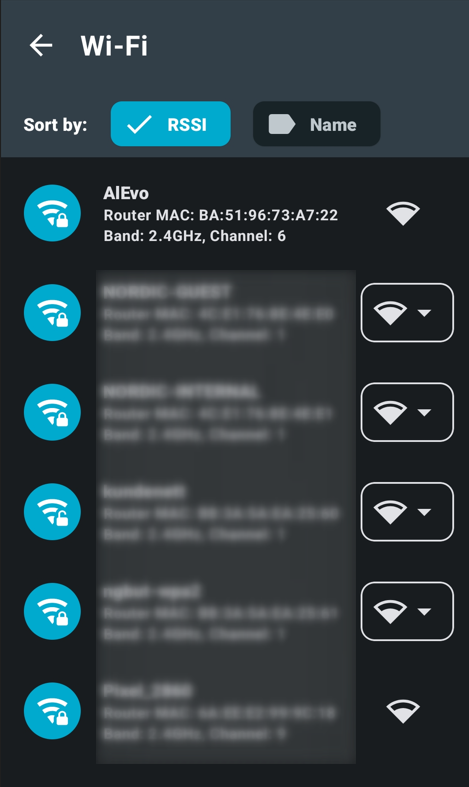
4. Select your Wi-Fi network from the list of available Wi-Fi networks and enter your Wi-Fi network password (access point/router password).
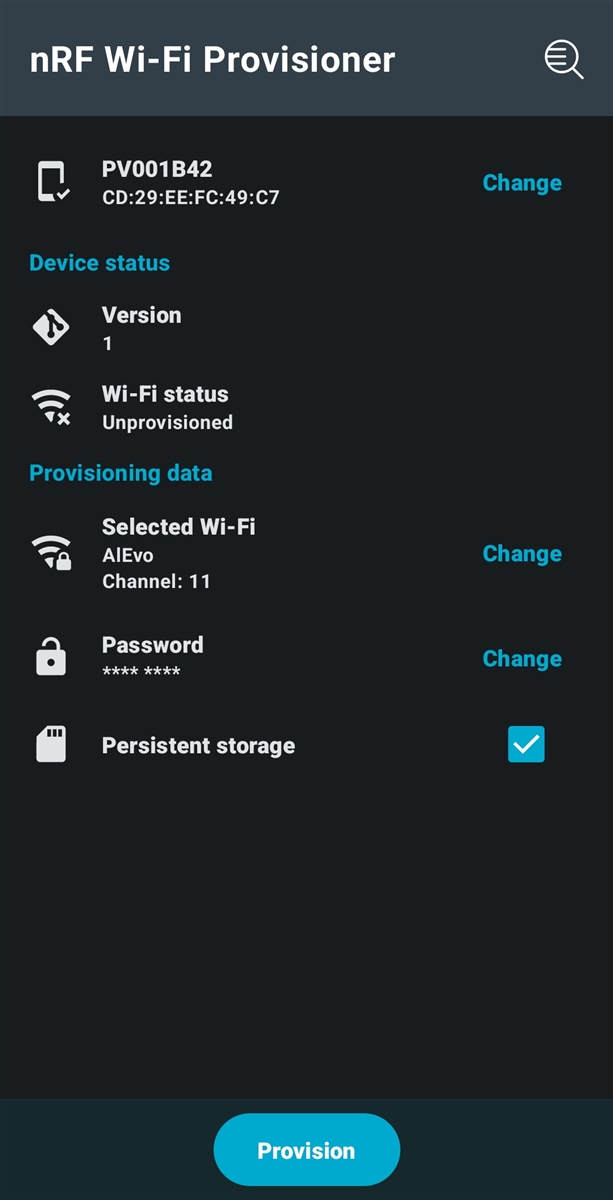
5. Make sure the Persistent storage is checked and press Provision. With this, your access point/router SSID and password are stored permanently on your nRF7002 DK.
Once the device is connected to the Wi-Fi network, it will try to connect to the MQTT broker. You can validate that by connecting to the board terminal using the built-in terminal in nRF Connect for VScode and examining the output.
Stage 3: Connect to the nRF7002 DK over MQTT
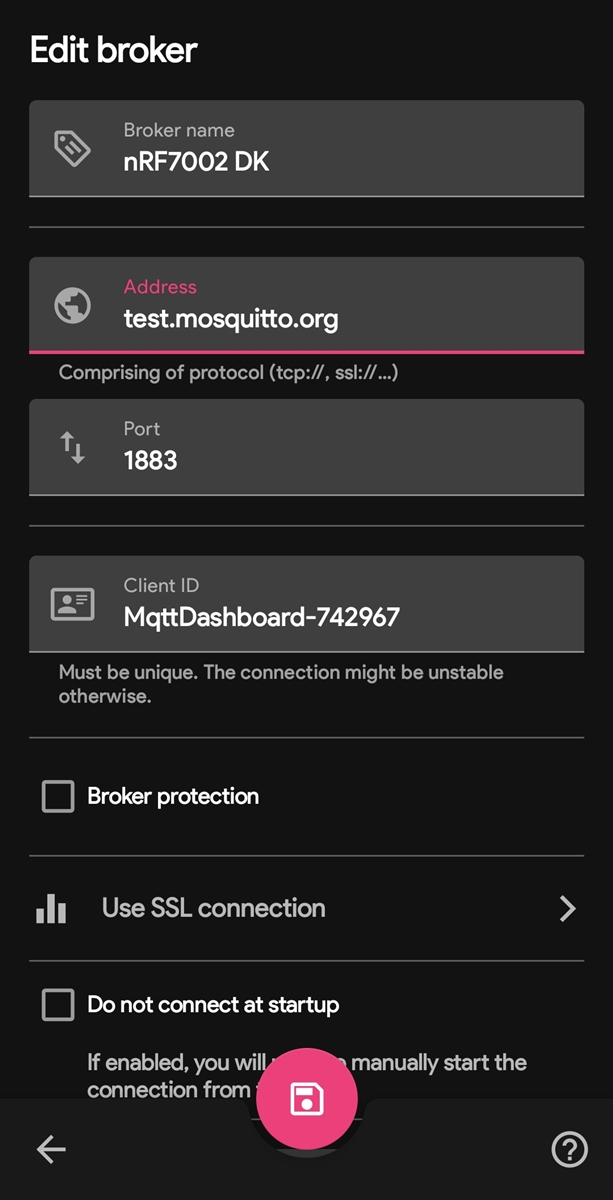
The nRF7002 DK will act as an MQTT client and connect, by default, to the public broker test.mosquitto.org. This can be changed to any broker of your preference by simply changing the Kconfig symbol in prj.conf. The MQTT client subscribes to the MQTT topic CONFIG_MQTT_SUB_TOPIC and will switch on/off LED1 and LED2 based on the received text (“LED1ON“, “LED1OFF“, “LED2ON“, “LED2OFF“).

The DK also publishes to the MQTT topic CONFIG_MQTT_PUB_TOPIC every time Button 1 or Button 2 is pressed. The text that it sends is “Button X is Pressed“, where X is either 1 or 2.
Remember that MQTT is a publish/subscribe protocol that allows multiple clients to connect to the same broker and potentially publish/subscribe to the same topics. Therefore, it is recommended to change the CONFIG_MQTT_SUB_TOPIC and CONFIG_MQTT_PUB_TOPIC to your preferred topics (ex: nRF7002DK/subscribe/mytopic389gsk3aX and nRF7002DK/publish/mytopic389gsk3aX) to try to avoid multiple users using the same topics.
On the other side, your smartphone (or tablet or PC) needs to connect to the same MQTT broker that the board is connected to and do the opposite. That is, publish to CONFIG_MQTT_SUB_TOPIC to control the LEDs on the board and subscribe to CONFIG_MQTT_PUB_TOPIC to get notifications when a button is pressed on the board.
1. Download an MQTT client on your smartphone, tablet, or PC.
There are many available options for an MQTT client depending on where you want to run it. For instance, on a PC, you can use MQTT Explorer.
For this blog post, we will use an Android mobile app called MQTT Dashboard. The documentation of the app can be found here.
You can get the MQTT Dashboard MQTT client on your smartphone or tablet by simply searching & installing MQTT Dashboard in Play Store.
2. Connect to the same MQTT broker used by the nRF7002 DK.
Tap on the + symbol to add a broker as shown below:
3. Control the LEDs on the nRF7002 DK
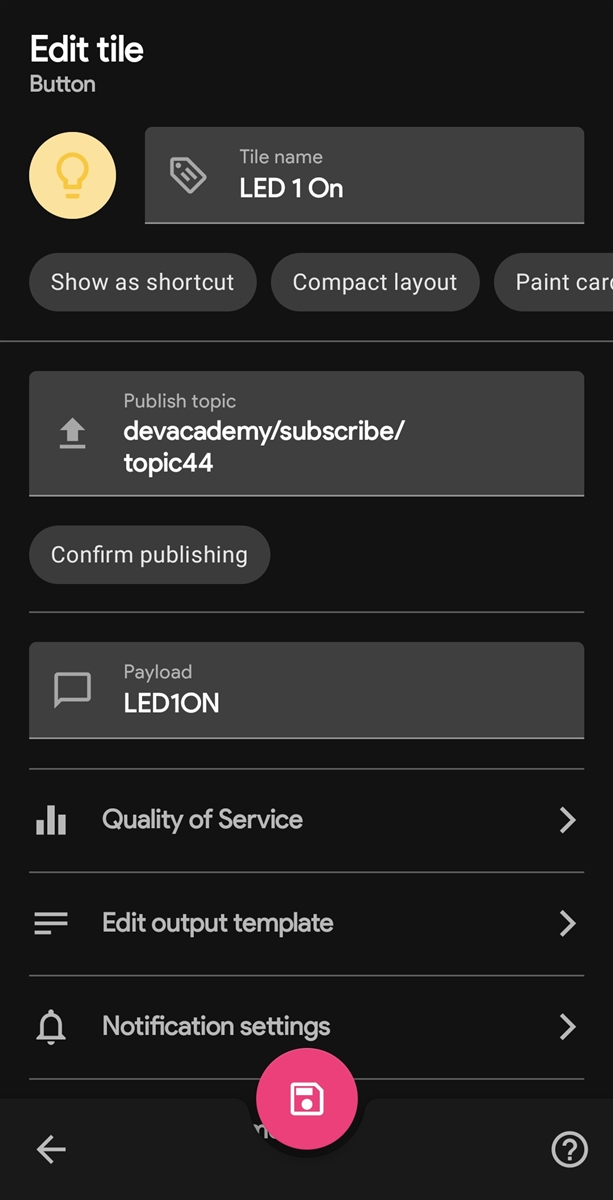
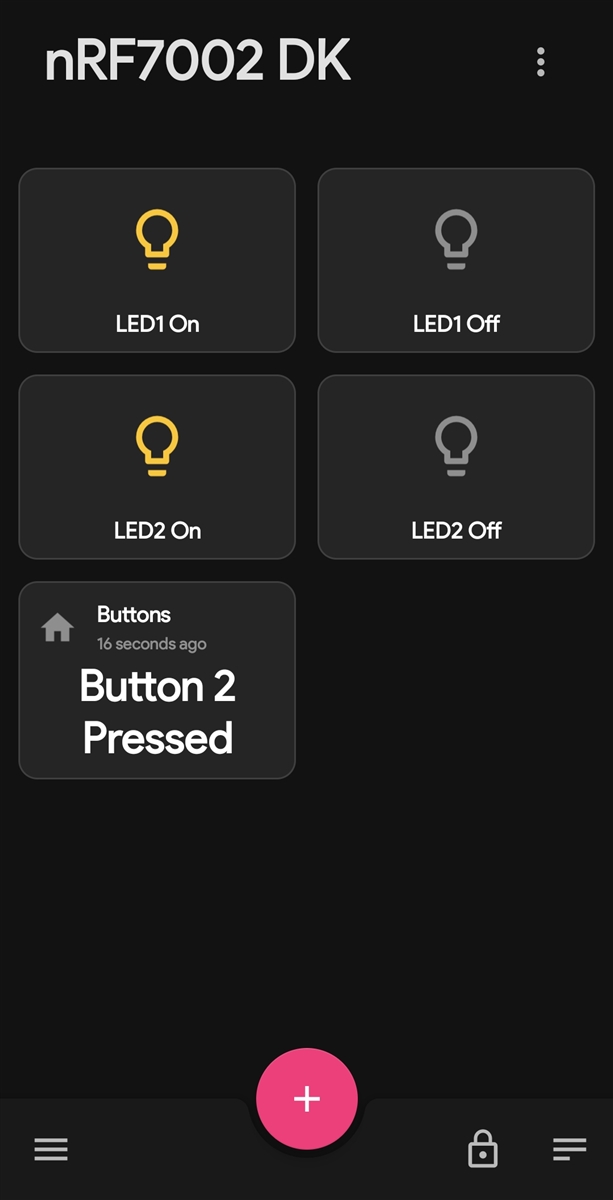
To control the LEDs on the nRF7002 DK, we need to publish to the topic CONFIG_MQTT_SUB_TOPIC. We can do that in MQTT Dashboard by adding a button tile.
3.1 Create a button tile to turn on LED1
Notice that we specified the default value of CONFIG_MQTT_SUB_TOPIC which is devacademy/subscribe/topic44 in the Publish topic and the payload “LED1ON“.
If you have changed the value of CONFIG_MQTT_SUB_TOPIC in the nRF7002 DK firmware, you need to provide the updated topic.
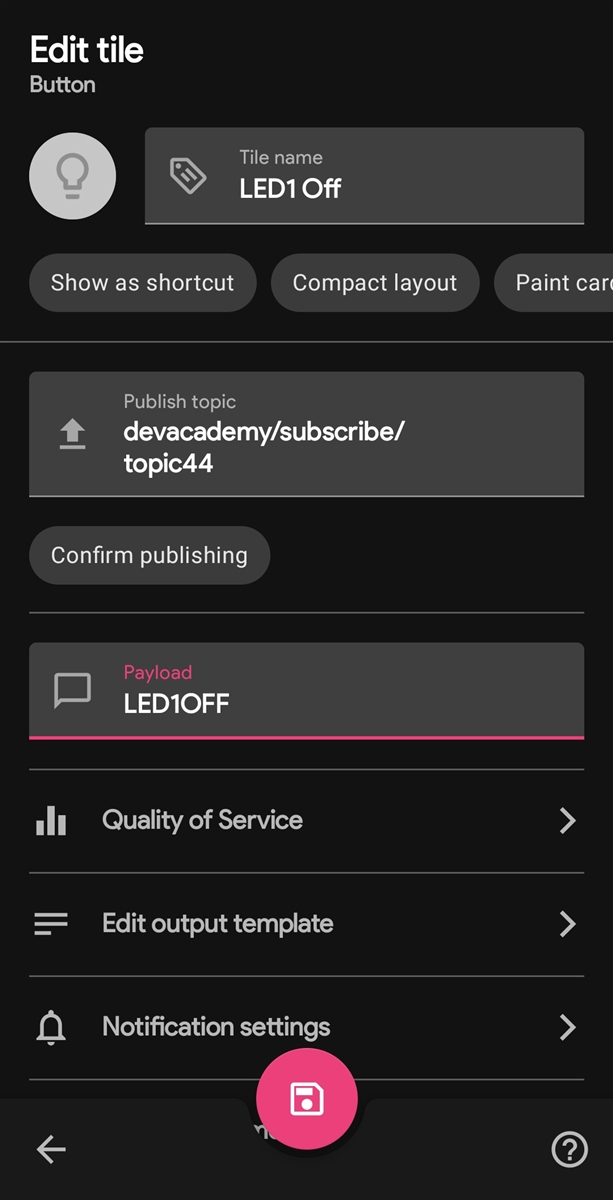
3.2. Create a button tile to turn off LED1
Notice that we specified the default value devacademy/subscribe/topic44 in the Publish topic and the payload “LED1OFF“.
Again, if you have changed the value of CONFIG_MQTT_SUB_TOPIC in the nRF7002 DK firmware, you need to provide the updated topic.
3.3 Similar to steps 3.1 and 3.2, create two button tiles for LED2, one to turn it on and another to turn it off.
4. Monitor the buttons on the nRF7002 DK
For this, we need to subscribe to the MQTT topic CONFIG_MQTT_PUB_TOPIC.
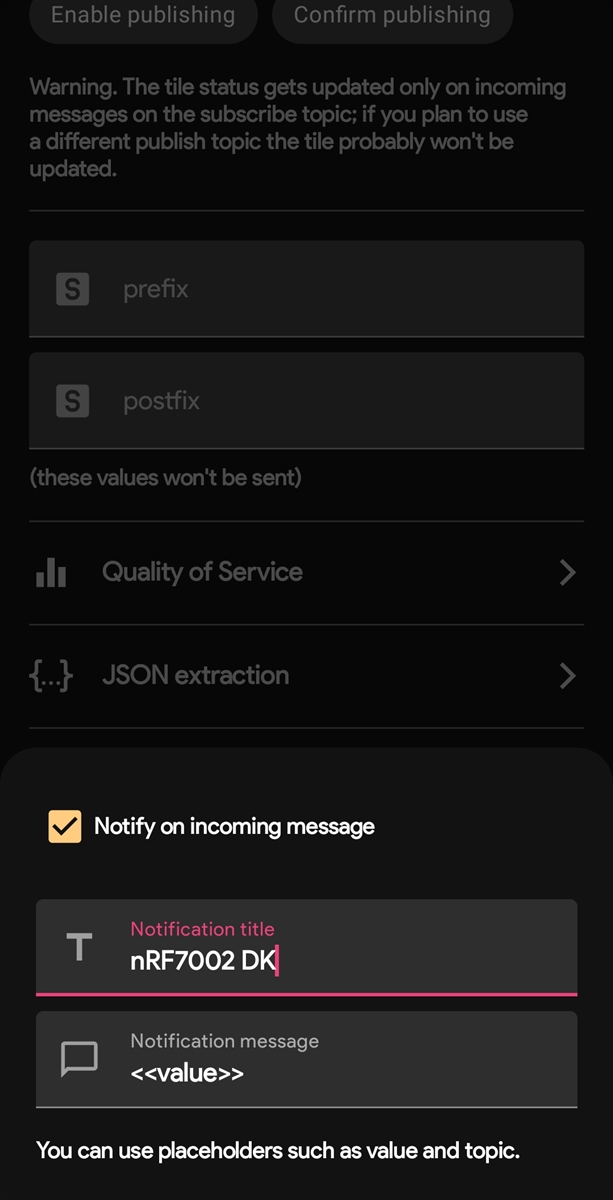
In MQTT Dashboard, we can do that by adding a text tile and enabling notificatiosn so that we get notified every time the button is pressed with the notification title “nRF7002 DK” and notification content of the topic value <<value>>.
Add a button tile as shown below :
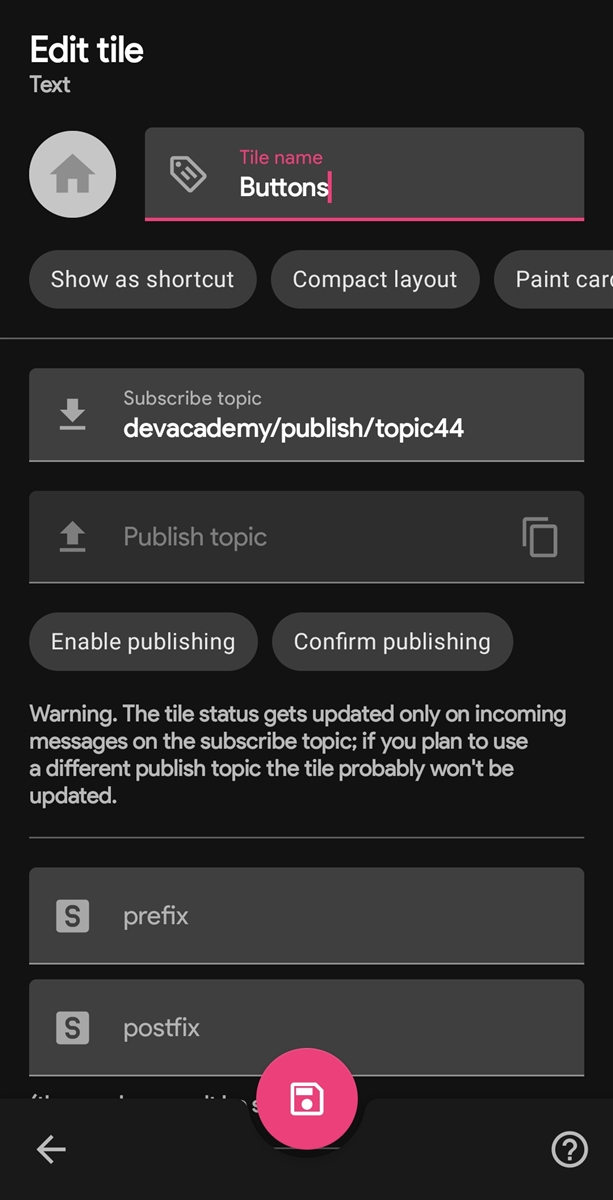
Notice that we specified the default value devacademy/publish/topic44 in the subscribe topic.
If you have changed the value of CONFIG_MQTT_PUB_TOPIC in the nRF7002 DK firmware, you need to provide the updated topic.
Enable notifications by scrolling down, pressing on Notification Settings, and populating the settings as shown below:
Stage 4: Control the nRF7002 DK remotely
Now we have the dashboard ready to control and monitor our nRF7002 DK remotely from our phone as shown in the video earlier in this blog post.
It’s worth noting that the screenshots in this blog post are for the software and tools versions shown in the table below. If you are using a newer version of the software and/or tools, the user interface may be different.
| Software/Tool | Version |
| nRF Connect SDK | 2.3.0 |
| Visual Studio Code | 1.75.0 |
| nRF Connect for VS Code | 2022.11.140 |
| nRF Wi-Fi Provisioner (Android) | 1.0.1(695) |
| MQTT Dashboard (Android) | 1.0.0- build 67 |
Further reading
- Official MQTT Sample in nRF Connect SDK that supports both Wi-Fi and Cellular IoT.
- Want to learn more about MQTT? Check out Lesson 4 in our Cellular IoT Fundamentals course in the Nordic Developer Academy.
- How about learning adding TLS support for MQTT? Check out Lesson 4 – Exercise 2 in our Cellular IoT Fundamentals course.
- Wi-Fi Protocol.
- Wi-Fi Samples on the nRF7002 DK.
Change log
- 10/02/2023 11:00 AM – Ali Aljaani – Initial blog.
- 03/03/2023 01:00 PM – Ali Aljaani:
- Updated the code to use nRF Connect SDK v2.3.0.
- Updated the code to use the Wi-Fi Provisioning Service available in the nRF Connect SDK instead of implementing it in the application code.
- Added a link in the Further reading to the official MQTT sample in nRF Connect SDK that supports both Wi-Fi and Cellular IoT.